What’s the Easiest Way to Clean a Lawn Mower Carburetor?
Key Takeaways
- The “easiest” way to clean a lawn mower carburetor really depends on how badly it’s clogged.
- For minor sputtering or rough running, a quick cleaning with carburetor spray can often be done without removing the carburetor from the engine.
- For a mower that won’t start at all (especially after sitting all winter), a full disassembly and cleaning is the most reliable and effective method.
A clogged engine is most likely to blame if your lawn mower sputters, coughs, or just won’t start at all. We see this problem a lot every day because we work in customer service. It’s usually something you can fix yourself, which is good news. From a simple spray method on the mower to a full, sure deep clean, we’ll show you the easiest ways to clean it so that it works like new again.
What You Need to Know
Before you grab a screwdriver, it’s important to understand why this happens and how to do the job safely. A little knowledge here goes a long way.
Fuel is the Key Factor
The number one enemy of your carburetor is stale fuel. Here’s what happens: most of the gasoline you buy today contains ethanol (usually 10%, or E10). Ethanol is “hygroscopic,” which is a fancy way of saying it loves to attract and absorb water right out of the air.
When your mower sits for months, that ethanol-blended fuel starts to break down. The water separates from the gas, and the gasoline itself evaporates, leaving behind a sticky, gooey, varnish-like gunk. This gunk is what clogs the tiny, microscopic passages (called “jets”) inside your carburetor. Since the carburetor’s job is to mix a perfect, fine mist of fuel and air, even a tiny speck of this gunk can stop your engine cold.
Safety First, Always
You are working with gasoline and flammable fumes. Do not take shortcuts on safety.
- Disconnect the Spark Plug: Before you do anything else, pull the rubber wire off the spark plug. This makes it 100% impossible for the engine to accidentally start while your hands are in the way.
- Ventilation is Key: Work in a well-ventilated area, like your driveway or an open garage. The fumes from gasoline and carburetor cleaner are strong and flammable.
- Wear Protection: Safety glasses are a must. Carburetor cleaner is highly pressurized and stings badly if it gets in your eyes. Nitrile gloves are also a great idea to protect your skin.
- No Sparks: This should be obvious, but don’t smoke, weld, or create any sparks near your work area.
Two Main Approaches
There isn’t just one “easiest” way. There is the fastest way and the most effective way.
- The Spray Method (Without Removal): This is the fastest. You clean the main parts while the carburetor is still on the engine. It’s best for minor clogs when the mower still mostly runs, but just sputters a bit. It’s a bit of a gamble, but it’s low-effort.
- The Full Cleaning (With Removal): This is the most effective. You take the carburetor completely off the engine, take it apart, and clean every single jet and passage. This is the guaranteed fix for a mower that won’t start due to a bad clog. It takes more time but is the 100% reliable solution.
Carburetor Cleaner is Best
Please, do not use WD-40, brake cleaner, or gasoline to clean your carburetor. Use a can of dedicated carburetor cleaner spray. This product is specially formulated to dissolve that specific gas varnish and gunk without damaging any of the sensitive rubber gaskets or plastic parts inside.
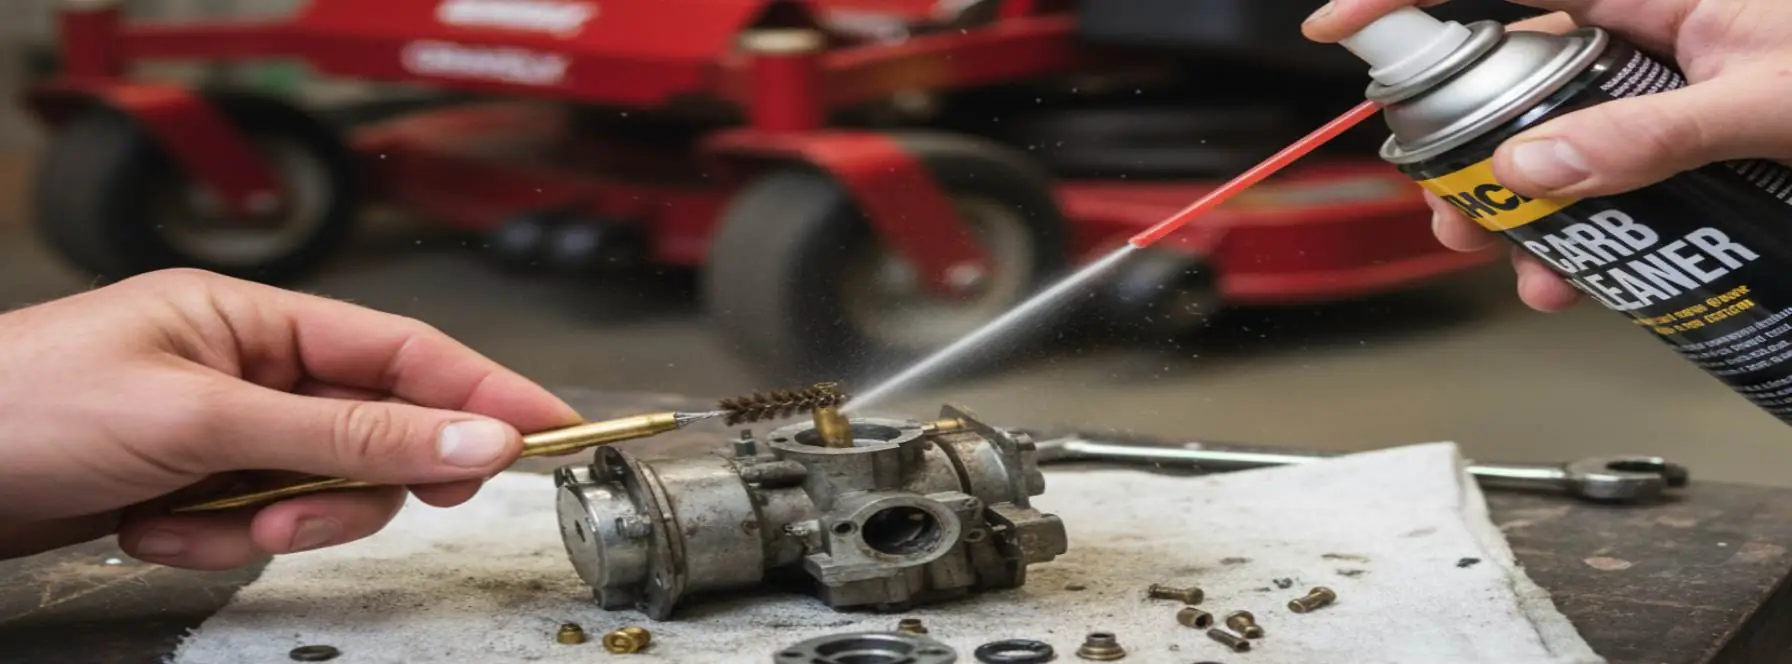
Method 1: Cleaning a Carburetor Without Removal (The Fast Way)
Try this method if your mower still runs but is running rough.
Step 1 — Disconnect and Access
First, disconnect the spark plug wire and secure it so it can’t touch the spark plug. Next, locate your air filter cover. It’s usually a plastic or metal box on the side of the engine, held on by a couple of screws or plastic tabs. Remove the cover and take out the paper or foam air filter. This will expose the “throat” of the carburetor, which is where the engine breathes in air.
Step 2 — Locate and Clean the Float Bowl
Look directly under the carburetor. You’ll see a small metal “cup” or “bowl” at the bottom. This is the float bowl, and it holds a small reservoir of gasoline. It’s usually held on by a single bolt at the very bottom.
Place a rag or an oil pan under the carburetor to catch the fuel that’s about to spill out. Use a socket wrench to carefully unscrew that bottom bolt. As you loosen it, gasoline will start to drip out. Remove the bolt and the bowl.
Look inside the bowl. Is it clean, or does it have a brown, sticky film or white, crusty deposits? Spray the inside of the bowl with your carburetor cleaner until it’s sparkling clean. Now, look at the bolt you just removed. It’s not just a bolt—it’s the main jet. It has a tiny, precise hole running right through the middle. Spray carb cleaner directly through this hole until you can see daylight clearly through it.
Step 3 — Spray and Reassemble
With the bowl still off, spray a generous amount of carburetor cleaner up into the bottom of the carburetor where the bowl attaches. You’re aiming for the brass or plastic tube hanging down (that’s the “pickup tube”).
Next, spray the cleaner into the main throat of the carburetor where the air filter was. You’ll see a small brass jet or nozzle in there. Give it a good blast. Use a soft brush (an old toothbrush works) to gently scrub away any visible gunk.
Once you’re satisfied, re-install the float bowl, making sure the rubber gasket is seated correctly. Tighten the bowl nut (the main jet bolt) until it’s snug. Don’t overtighten it. Put the air filter and its cover back on, and reconnect the spark plug wire. Try to start the engine. It may take a few extra pulls to refill the float bowl with gas.
Method 2: Cleaning a Carburetor After Removal (The “Guaranteed” Way)
This is the method for a mower that won’t start at all, or if Method 1 didn’t work.
Step 1 — Disassemble and Remove
This is the part that makes people nervous, but it’s easier than it looks. Take pictures with your phone at every step. This is the best tip we can give you. It will be your map for putting it all back together.
- Safety: Disconnect the spark plug wire.
- Air Filter: Remove the air filter and the entire air filter housing (the plastic base) that’s bolted in front of the carburetor.
- Fuel Line: Find the rubber fuel line going into the side of the carburetor. Use a pair of pliers to squeeze the small metal clamp and slide it down the hose. You can use a fuel line clamp (or a pair of locking pliers) to pinch the line shut to prevent all the gas from draining out of your tank. Gently twist and pull the rubber hose off the carburetor.
- Linkages: This is the most important part to photograph. You will see one or two thin metal rods (called linkages) connecting the carburetor to the engine’s throttle and choke controls. Note exactly which holes they go into. You can usually remove them by twisting the carburetor slightly to give them slack.
- Unbolt: The carburetor is typically held onto the engine by two long bolts (the same ones that held the air filter housing). Remove these bolts, and the carburetor is now free.
Step 2 — Soak and Scrub
Work on a clean, well-lit bench with a shop towel laid out.
- Remove the float bowl (the bottom bolt, just like in Method 1).
- Remove the float. It’s held in place by a small metal pin. Use a small nail or a pick to gently push this pin out. The float and the attached needle valve will lift right out.
- Remove any gaskets or rubber o-rings you see. Do not soak rubber or plastic parts in strong cleaner, as it can swell or destroy them.
- Now, spray every part of the carburetor—inside and out—with your cleaner. For really stubborn, varnish-filled carbs, you can buy a one-gallon “dip can” of carburetor cleaner at an auto parts store. You can soak all the metal parts in this basket for an hour, and they will come out looking brand new.
Step 3 — Clear Passages and Jets
This is the most crucial step. The clog is in a hole you can barely see.
- Use the thin red straw that comes with your carb cleaner spray. Forcefully spray it through every single hole and passage you can find on the carburetor body. You should see the cleaner spraying out of another hole somewhere else.
- If a jet is completely blocked, do not use a paperclip or a drill bit to clear it. These jets are precision-drilled, and widening the hole by even a tiny amount will ruin the air/fuel mixture.
- Instead, use a very small, soft wire. A single bristle from a wire brush is perfect. A bread-bag twist-tie with the paper burned off also works. Gently poke this wire through the main jet (the bowl bolt) and any other tiny brass jets you find. Follow up with another blast of carb cleaner.
Step 4 — Reassemble and Test
Once everything is perfectly clean, reassemble in reverse order.
- Put the needle valve back on the float, and put the float back in place, sliding the pin through to secure it.
- It’s always a good idea to use new gaskets (a carburetor rebuild kit is cheap and includes them).
- Re-install the float bowl and gasket.
- Refer to your pictures and re-attach the throttle and choke linkages. This is the easiest place to make a mistake, so double-check your photos.
- Bolt the carburetor back onto the engine.
- Re-attach the fuel line and slide the clamp back in place.
- Re-install the air filter assembly.
- Reconnect the spark plug wire.
Un-pinch the fuel line. Give the mower a few pulls to get fuel flowing and fill the bowl. It should fire right up.
A Note for Georgia Homeowners
Here in Georgia, our humid climate is especially tough on small engines. That humidity means there’s a lot of moisture in the air, and the ethanol in your gas is pulling that water into your fuel tank 24/7. This is why using a fuel stabilizer isn’t just a suggestion—it’s a requirement for keeping your equipment healthy. A good stabilizer (we can show you which ones we trust) prevents the fuel from breaking down and keeps that gunk from forming in the first place.
If you get stuck, need parts like a carburetor gasket kit, or just want a professional to take care of it for you, visit our store in Columbia, SC. We can help you with anything from a simple cleaning to a full repair.
Client Reviews
“Catoe’s Power Equipment has great products and even better customer service! As a regular homeowner with an overgrown yard, I needed to rent a riding mower with enough power to get the job done. The process was incredibly easy—I had an invoice texted to me within minutes of getting off the phone. The mower was delivered on time, and even when I ran into a low battery issue, they went above and beyond by bringing out a commercial mower within 30 minutes. I was able to finish my yard with no hassle, and they picked up the equipment within 20 minutes of me finishing.” – JP Shorter
“Definitely the best customer experience that I’ve had in years. They answered all of my questions and were prompt in returning my phone calls. I’m so glad I went with them for my new mower over the big box stores. – M. Hightower.
Frequently Asked Questions (FAQ)
Q: What is the best thing to clean a lawn mower carburetor?
A: The most effective product is a specialized carburetor cleaner spray, which you can find at any hardware or auto parts store. For a very deep clean, you can use a 1-gallon “dip can” of cleaner. A carburetor cleaning kit with tiny, flexible wires is also very helpful for clearing stubborn jets.
Q: Is there a way to clean a lawn mower carburetor without removing it?
A: Yes. For minor clogs, you can follow our “Method 1” in this guide. This involves removing the air filter and the float bowl, cleaning the bowl and the main jet bolt, and spraying cleaner directly up into the carburetor body while it’s still on the engine.
Q: Can you spray carb cleaner directly into a carb lawn mower?
A: Yes. You can spray it into the carburetor’s “throat” (where the air filter goes) while the engine is running. This can sometimes help clear a minor clog by letting the cleaner get sucked through the jets with the fuel. However, it’s not as effective as a proper disassembly and cleaning.
Q: Can you use WD-40 to clean a lawn mower carburetor?
A: No, absolutely not. WD-40 is a lubricant and water displacer, not a cleaner. It will not dissolve the varnish and gum deposits that cause clogs. In fact, it will likely mix with the sticky gas and make the problem even worse. Only use a product specifically labeled as “Carburetor Cleaner.”
A clean carburetor is the key to a reliable, long-lasting mower. By following these easy steps, you can save yourself a frustrating afternoon and a costly trip to the repair shop. And remember, the real easiest way is prevention: always use a fuel stabilizer!
Need carburetor cleaner, a new gasket set, or a professional hand? Visit our store in Columbia, SC, for all your lawn mower needs!